Setting up an autoresponder in Plesk Onyx can be a game-changer for your email communication. Whether you want to inform clients about your absence or acknowledge received emails, an autoresponder can handle it all. In this guide, we’ll walk you through the step-by-step process of configuring an autoresponder in Plesk Onyx to streamline your email management.
What is an Autoresponder?
Before we dive into the technical details, let’s clarify what an autoresponder is. An autoresponder is an email feature that sends an automatic response to incoming messages based on predefined rules. This can be a simple acknowledgment of receipt, an out-of-office message, or a custom response tailored to your needs.
Prerequisites
Before you start configuring your autoresponder, ensure you have the following:
- Plesk Onyx: Make sure you have access to a Plesk Onyx control panel;
- Email Account: You’ll need an existing email account to set up the autoresponder for.
Step 1: Accessing Plesk Onyx
Logging in to your Plesk Onyx control panel is the initial step in setting up your autoresponder. Ensure that you have your login credentials ready. This panel is your gateway to managing various aspects of your web hosting, including email settings.
To access Plesk Onyx, open your preferred web browser and enter the URL provided by your hosting provider. Once on the login page, enter your username and password. If you’re unsure about your login details, contact your hosting provider’s support team for assistance. Once successfully logged in, you’ll have access to the Plesk Onyx dashboard, where you can configure various settings for your hosting environment.
Step 2: Navigating to Mail Settings
With Plesk Onyx now open, the next step is to navigate to the “Mail” section. This is where you’ll find all the tools and settings related to your email accounts.
In the left-hand menu, look for the “Mail” option and click on it. Plesk Onyx is designed with user-friendliness in mind, and the menu is typically organized logically, making it easy to locate the email settings.
Step 3: Selecting the Email Account
Once you’re in the “Mail” section, you’ll see a list of email accounts associated with your hosting environment. Scroll through the list or use the search function to find the specific email account for which you want to set up the autoresponder.
Selecting the correct email account is crucial as the autoresponder settings you configure will apply specifically to this account. Click on the email account’s name or identifier to access its settings.
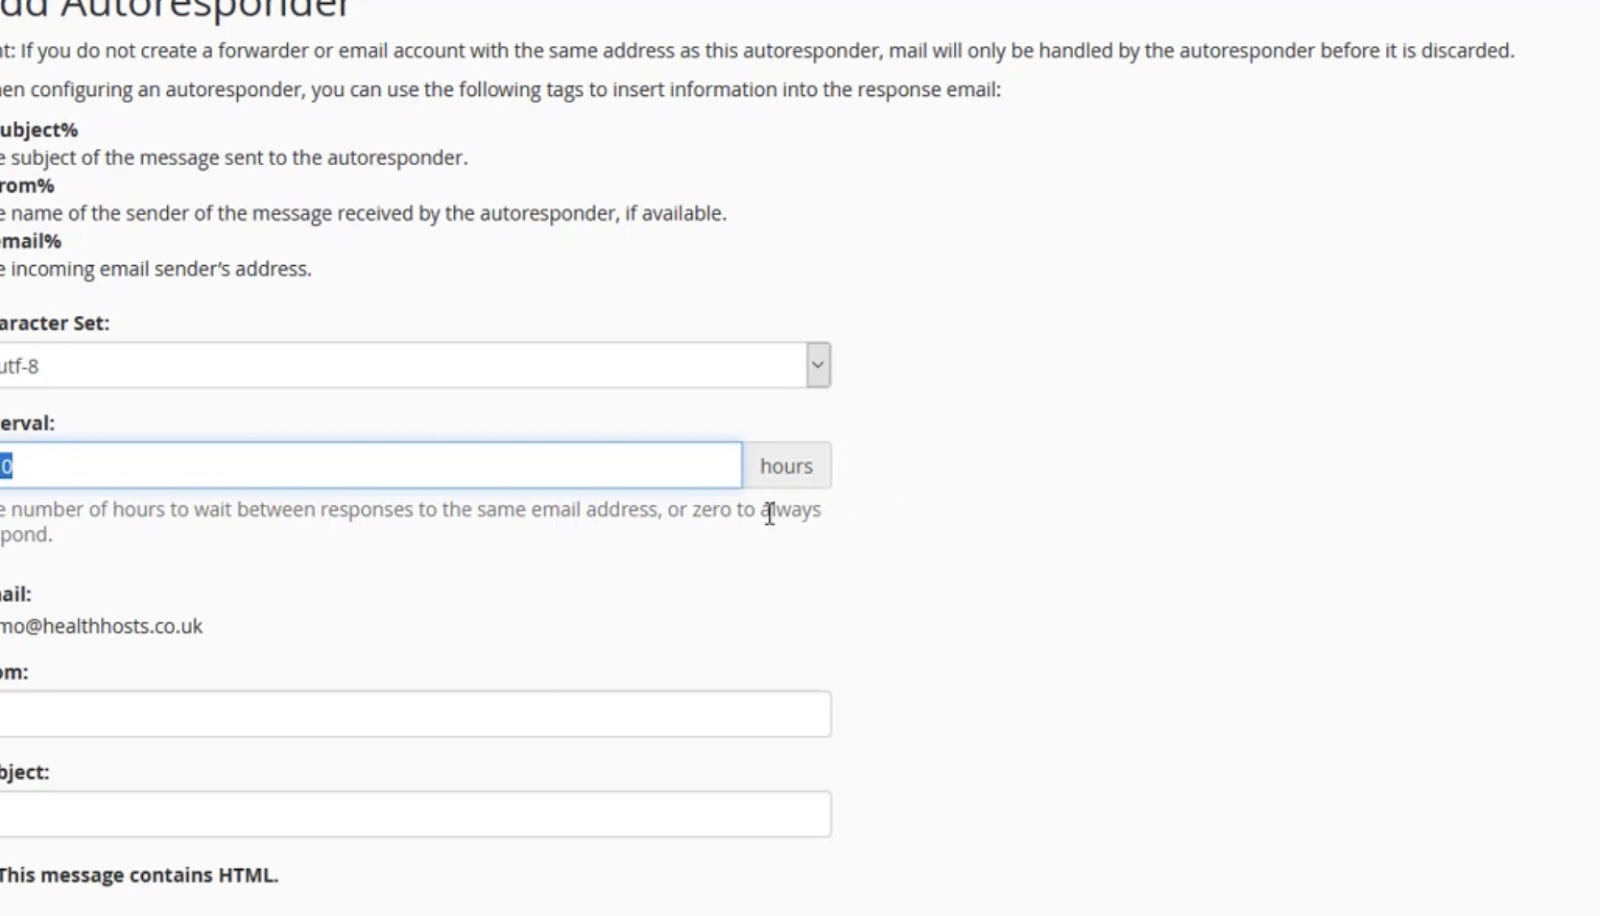
Step 4: Configuring Autoresponder Settings
Inside the settings of the selected email account, you’ll find various tabs or sections related to email management. Look for the “Auto-Reply” tab or a similar option. This is where you’ll configure the autoresponder for this particular email account.
The “Auto-Reply” tab is where you’ll define the behavior of your autoresponder, including the message content, subject, and activation dates. Be prepared to customize these settings according to your specific requirements and preferences.
Step 5: Enabling the Autoresponder
Before you proceed with configuring the autoresponder parameters, you need to enable it. You’ll typically find a toggle switch or checkbox that allows you to activate the autoresponder. Make sure to turn it on to enable the feature.
Enabling the autoresponder ensures that it will respond to incoming emails according to the settings you define in the subsequent steps. Without enabling it, the autoresponder will remain inactive.
Step 6: Setting Up Response Parameters
Now that your autoresponder is enabled, it’s time to configure its parameters. These parameters include the subject of the autoresponse, the body text of the message, and the start and end dates for when the autoresponder should be active.
- Subject: The subject line is what recipients will see when they receive your autoresponse. It should be concise and convey the purpose of the message. For example, if you’re setting up an out-of-office autoresponder, your subject might be “Out of Office Notification”;
- Text: The body of your autoresponse message should provide clear and relevant information to the sender. Depending on the purpose of the autoresponder, this text can vary widely, from a simple acknowledgment of receipt to a detailed message explaining your absence or providing contact information;
- Start and End Dates: Specify the period during which you want the autoresponder to be active. This ensures that it only responds to emails within the defined timeframe. For example, if you’re on vacation, you can set the start and end dates to cover your absence period.
Step 7: Save and Apply
After configuring the autoresponder parameters to your satisfaction, don’t forget to save your settings. Most email management interfaces in Plesk Onyx will have a “Save” or “Apply” button that you should click to confirm your changes.
Saving your settings ensures that the autoresponder will behave as you’ve defined in the previous steps. Without saving, your configurations won’t take effect.
Step 8: Test Your Autoresponder
Once you’ve configured and saved your autoresponder settings, it’s essential to test it to ensure it functions as expected. Testing is a crucial step in the setup process, as it allows you to verify that your autoresponder sends the desired response to incoming emails.
To test your autoresponder, send an email from a different email account to the one for which you’ve set up the autoresponder. Observe how the autoresponder handles the incoming email and whether it delivers the correct autoresponse message.
Step 9: Monitor and Adjust
After your autoresponder is active, it’s important to continuously monitor its performance. Keep an eye on how it responds to incoming emails and ensure that it aligns with your expectations. Additionally, regularly review the autoresponder’s settings to make any necessary adjustments.
If your circumstances change or if you receive feedback from recipients, you may need to modify the autoresponder’s message or activation dates. For example, if you return from vacation earlier than planned, remember to disable or adjust your out-of-office autoresponder accordingly. Monitoring and adjusting your autoresponder ensures that it remains effective and meets your communication needs. By following these extended steps, you’ll be able to set up an autoresponder in Plesk Onyx with greater clarity and confidence.
Advanced Autoresponder Configuration
Now that you have the basics of setting up an autoresponder in Plesk Onyx, let’s explore some advanced configurations and tips to make your email autoresponses even more effective.
- Personalization
Make your autoresponder messages feel more personal by including the recipient’s name or other relevant details. Plesk Onyx allows you to use variables such as `%recipient_name%` or `%recipient_email%` to dynamically insert this information. For example:
Hello %recipient_name%,
This personal touch can make your autoresponder messages more engaging and user-friendly.
- Multiple Autoresponders
In some cases, you might need to set up multiple autoresponders for different purposes. For instance, one for out-of-office messages, another for marketing inquiries, and yet another for technical support queries. Plesk Onyx enables you to create and manage multiple autoresponders for different email accounts, each with its unique settings and rules.
- Custom Rules and Filters
Take advantage of custom rules and filters to fine-tune when your autoresponder activates. You can set rules based on sender email addresses, specific keywords in the subject line, or other criteria. This allows you to send different autoresponses depending on the nature of the incoming email.
For example, you can configure your autoresponder to send a detailed technical support guide when it detects keywords like “technical issue” or “troubleshooting” in the email subject. This level of customization ensures that your autoresponses are relevant and helpful.
- Attachments
Plesk Onyx also allows you to include attachments in your autoresponse emails. This feature can be valuable if you need to share documents, brochures, or other files with your correspondents automatically. Ensure that your attachments are well-organized and clearly labeled to provide a seamless user experience.
- Avoid Overuse
While autoresponders are helpful, overusing them can be counterproductive. If your autoresponder sends a response for every incoming email, it may irritate your correspondents. Use them judiciously, especially when setting up autoresponders for marketing purposes, as excessive autoresponses may be perceived as spam.
- Multilingual Support
If your audience spans different regions and languages, consider setting up multilingual autoresponses. Create versions of your autoresponder message in different languages and use rules to send the appropriate response based on the sender’s language preference. This demonstrates your commitment to catering to a diverse audience.
- Test and Review Regularly
After configuring your autoresponder, periodically review its performance. Ensure that the messages remain up-to-date and reflect your current status or offerings. Test the autoresponder by sending test emails from various accounts to verify that it functions correctly and delivers the expected responses.
- Analytics and Metrics
Plesk Onyx may offer analytics or metrics related to your autoresponder’s performance. Monitor open rates, click-through rates (if you include links), and the overall effectiveness of your autoresponses. Use this data to make improvements and optimize your autoresponder strategy over time.
- Emergency Contacts
In certain situations, you may need to provide emergency contact information even when your autoresponder is active. Include clear instructions for reaching a real person in case of urgent matters. This ensures that critical issues don’t go unresolved due to automated responses.
- Compliance with Regulations
Be aware of email regulations, such as the CAN-SPAM Act in the United States or the GDPR in Europe, which govern the use of autoresponders. Ensure that your autoresponder messages comply with these regulations, especially when sending marketing or promotional content.
Conclusion
Setting up an autoresponder in Plesk Onyx can significantly improve your email communication efficiency. Whether you’re away on vacation or need to acknowledge incoming emails, this feature can handle it all. By following the steps outlined in this guide, you’ll be able to configure your autoresponder with ease and tailor it to your specific needs.
Automating your email responses with Plesk Onyx’s autoresponder feature not only saves time but also ensures that your correspondents receive timely and relevant information. Make the most of this powerful tool to enhance your email management experience.
Remember, effective communication is key in any business or personal context, and Plesk Onyx’s autoresponder is a valuable asset in achieving just that. Start using it today to streamline your email communication and provide prompt responses to your contacts.