In this digital age, having your own Virtual Private Server (VPS) can be a game-changer. Whether you’re a tech enthusiast or a small business owner, a VPS can provide you with more control, security, and flexibility compared to traditional hosting solutions. But fear not, because we’re here to guide you through an effortless VPS installation process.
What’s a VPS, Anyway?
Before we dive into the installation process, let’s briefly explain what a VPS is. Think of it as your own little piece of the internet. A VPS is a virtualized server that runs its own operating system, giving you full control over it without the need for physical hardware. It’s like having your private playground in the vast digital landscape.
Step 1: Choosing the Right VPS Provider
The first and most crucial step is selecting the right VPS provider. You want a reliable company that offers the resources and features you need. Some popular VPS providers include Amazon Web Services (AWS), DigitalOcean, and Linode. Research and compare prices, server locations, and customer reviews before making your decision.
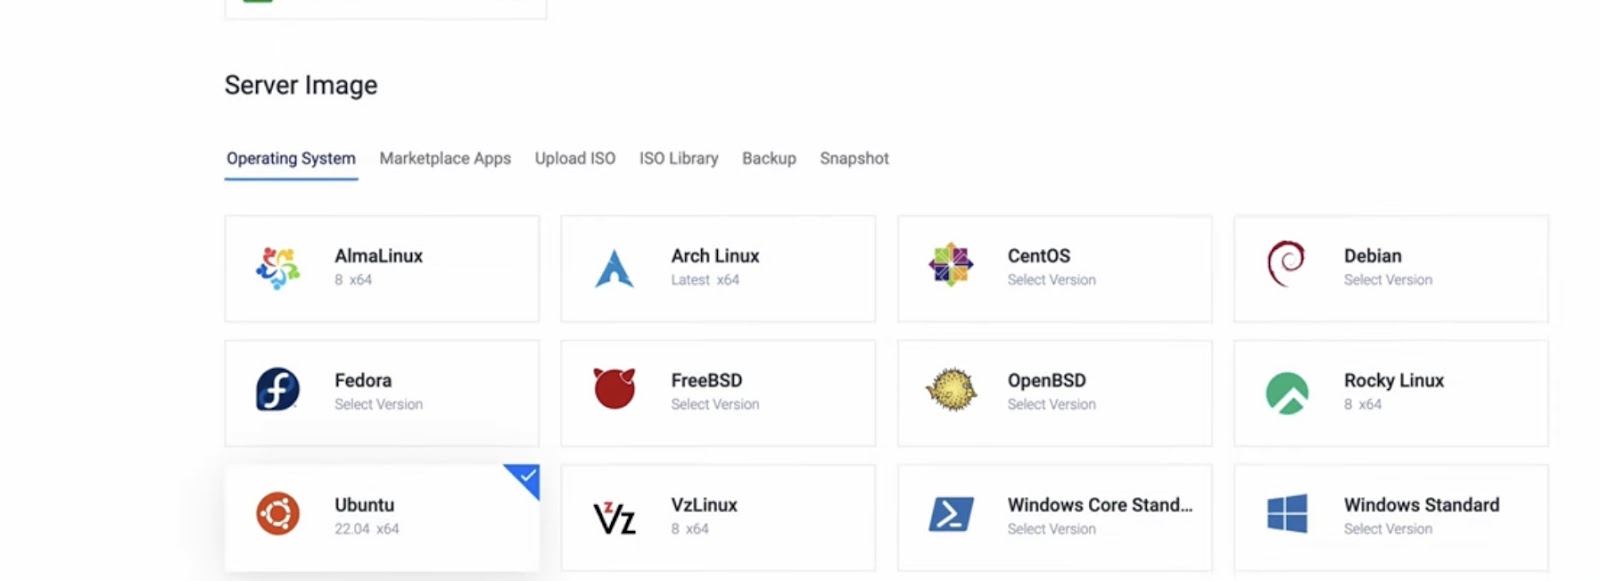
Step 2: Picking the Perfect Operating System
Once you’ve chosen your VPS provider, it’s time to select the operating system (OS) you want to run on your virtual server. Common options include Linux distributions like Ubuntu, CentOS, and Debian, as well as Windows Server for Windows enthusiasts. Choose the one that aligns with your needs and expertise.
Step 3: Setting Up Your VPS
Now comes the exciting part: setting up your VPS. Your provider will have a user-friendly dashboard that allows you to create a new virtual server. Click on “Create VPS” or a similar option, and you’ll be prompted to choose your server’s configuration, such as CPU, RAM, and storage. Remember, you can always upgrade these resources as your needs grow.
Step 4: Connecting to Your VPS
After your VPS is up and running, it’s time to connect to it. You’ll need a Secure Shell (SSH) client to access your server. If you’re on a Mac or Linux machine, open your terminal and use the “ssh” command followed by your server’s IP address and your login credentials. For Windows users, tools like PuTTY can do the trick.
Step 5: Updating and Securing Your VPS
Security should be a top priority. Start by updating your VPS to ensure you have the latest security patches. For Linux users, run the following commands:
```shell
sudo apt update
sudo apt upgrade
```
Next, secure your server by disabling root login and setting up a firewall. This will protect your VPS from unauthorized access and malicious attacks. You can find detailed instructions for your specific OS online.
Step 6: Installing Your Desired Software
Now that your VPS is secure, you can start installing the software you need. Whether it’s a web server, a database, or any other application, your VPS is ready to accommodate your requirements. Most Linux distributions come with package managers like “apt” or “yum” that make software installation a breeze. For example, to install the Apache web server on Ubuntu, use:
```shell
sudo apt install apache2
```
Step 7: Configuring Your Services
Configuration is where you tailor your VPS to your specific needs. This step may require some familiarity with the software you’re installing, but don’t worry; there are plenty of online resources and communities to help you out. Whether you’re setting up a website, a blog, or an online store, precise configuration ensures your VPS performs at its best.
Step 8: Backing Up Your Data
We can’t stress this enough: always back up your data. Regular backups are your safety net in case something goes wrong with your VPS. Most VPS providers offer backup solutions, but you can also set up your own backup scripts to ensure you never lose valuable data.
Conclusion
Setting up a VPS might sound daunting at first, but with the right guidance and a bit of patience, it’s a manageable process. Remember to choose a reliable VPS provider, secure your server, install the necessary software, and stay vigilant with monitoring and maintenance. Your VPS will become a valuable asset, providing you with the freedom and control you need in the digital world. So, what are you waiting for? Dive in and start experiencing the benefits of your very own Virtual Private Server!
FAQ: Effortless Install VPS
A VPS, or Virtual Private Server, is a virtualized server that operates independently with its own operating system. It provides users with full control over their server without the need for physical hardware. It’s like having your private piece of the internet where you can host websites, applications, and more.
VPS offers greater control, security, and flexibility compared to traditional shared hosting. With a VPS, you have dedicated resources, isolation from other users, and the ability to customize your server to meet your specific needs. It’s an excellent choice for individuals and businesses looking for more autonomy.
Selecting the right VPS provider is crucial. Consider factors like server location, pricing, customer support, and user reviews. Popular VPS providers include Amazon Web Services (AWS), DigitalOcean, and Linode. Research and compare to find the one that suits your requirements.
The choice of the operating system (OS) depends on your preferences and needs. Common options include various Linux distributions like Ubuntu, CentOS, and Debian, as well as Windows Server for Windows users. Choose an OS that aligns with your familiarity and the applications you plan to run on your VPS.
To connect to your VPS, you’ll need an SSH (Secure Shell) client. If you’re using a Mac or Linux machine, you can open your terminal and use the “ssh” command, followed by your server’s IP address and login credentials. Windows users can use tools like PuTTY for SSH connections.
Security is paramount for your VPS. Start by regularly updating your server to apply security patches. Additionally, disable root login and set up a firewall to protect against unauthorized access and potential threats. Detailed instructions for securing your specific OS can be found online.
Installing software on your VPS is typically straightforward, especially on Linux-based systems. Most Linux distributions come with package managers like “apt” or “yum.” You can use these package managers to install software and packages. For example, you can install the Apache web server on Ubuntu using the command “sudo apt install apache2.”
Regularly back up your data to safeguard against unexpected data loss. Many VPS providers offer backup solutions, but you can also set up your own backup scripts. Backing up your data ensures that you never lose valuable information in case of unforeseen events.
Monitoring your VPS is crucial for performance and security. You can monitor resource usage, system performance, and security logs. Tools like “top” for Linux or built-in dashboards from your VPS provider can help you keep an eye on these aspects. Staying informed about software updates and security vulnerabilities is also essential.
With these FAQs and our step-by-step guide, you’ll be well-prepared to embark on your VPS journey and enjoy the benefits of your very own Virtual Private Server.